
Welcome to the world of creative jewelry making with epoxy resin! This beginner's guide will walk you through the basics of getting started with this exciting craft. To begin, you'll need a few essential materials, including a precision scale, mixing cups, and silicone forms. You can also experiment with various pigments and decorations to add a personal touch to your creations.

For a more detailed guide on creating resin jewelry, you can refer to our comprehensive tutorial. With the right tools and a bit of practice, you can create beautiful, professional-looking pieces that showcase your unique style.
Key Takeaways
- Start with simple geometric forms and experiment with layering and embedding techniques.
- Use a precision scale to mix resin and hardener accurately.
- Work in a well-ventilated area and maintain a stable room temperature.
- Remove air bubbles using a heat gun for a smooth finish.
- Document your process to learn from mistakes and improve your craft.
Understanding Epoxy Resin: Basics and Benefits
Delving into the world of epoxy resin crafts reveals a realm of creative possibilities. Epoxy resin is a versatile and durable material that has gained popularity in jewelry making due to its unique properties and aesthetic appeal.
What is Epoxy Resin?
Epoxy resin is a type of liquid polymer that hardens when mixed with a hardener, creating a durable and glossy finish. This characteristic makes it ideal for resin casting techniques, allowing crafters to create intricate designs and shapes.
Benefits of Using Epoxy Resin in Jewelry
The use of epoxy resin in jewelry making offers several benefits. It provides a high-gloss finish that enhances the appearance of the jewelry. Additionally, epoxy resin is durable and resistant to wear, making it suitable for everyday wear. Its versatility also allows for a wide range of creative expressions, from encapsulating objects to creating complex designs.
Types of Epoxy Resins Available
There are various types of epoxy resins available, each with its own characteristics. Some are formulated for slow curing, allowing for more intricate work, while others cure quickly, ideal for projects that require rapid completion. Understanding these differences is key to selecting the right epoxy resin for your jewelry making projects.
Essential Tools and Materials for Jewelry Making
The art of creating jewelry with epoxy resin begins with gathering essential supplies. To ensure a smooth and enjoyable crafting experience, it's crucial to have the right tools and materials at your disposal.
Required Tools for Epoxy Resin Projects
To start making epoxy resin jewelry, you'll need a few basic tools. These include:
- A mixing cup or container for blending resin and hardener
- A stir stick or mixing tool for thorough mixing
- A silicone mold or jewelry mold to shape your resin
- A heat gun or torch for removing bubbles
- Sanding tools for smoothing out the finished product
Having these tools on hand will help you achieve professional-looking results. For instance, using a heat gun can significantly reduce the appearance of bubbles in your resin, ensuring a clearer finish.
Must-Have Materials for Jewelry Making
The quality of your materials can significantly impact the final product. Essential materials include:
| Material | Description | Use |
|---|---|---|
| Epoxy Resin | A two-part resin known for its durability and clarity | Main component for jewelry making |
| Hardener | A chemical that reacts with epoxy resin to harden it | Used in conjunction with epoxy resin |
| Pigments or Dyes | Colorants that can be added to epoxy resin | For coloring the resin |
Selecting the right materials is crucial for achieving the desired look and durability in your jewelry pieces.
Safety Equipment and Precautions
Working with epoxy resin requires some safety precautions to protect yourself from potential hazards. Essential safety equipment includes:
- Gloves to prevent skin contact with resin and hardener
- Goggles or safety glasses to protect your eyes
- A mask or respirator to avoid inhaling fumes
- A well-ventilated workspace to prevent the accumulation of fumes
"Safety is not just a precaution, it's a necessity when working with chemicals like epoxy resin." - Expert Craftsman
Taking these precautions seriously will ensure a safe and enjoyable crafting experience.
Designing Your Jewelry: Ideas and Inspiration
Epoxy resin offers a versatile medium for crafting unique and beautiful jewelry pieces. With its ability to be colored, molded, and shaped, epoxy resin allows jewelry makers to bring their creative visions to life.
Popular Jewelry Styles Using Epoxy Resin
Epoxy resin can be used to create a wide range of jewelry styles, from modern and minimalist to elaborate and statement-making. Some popular styles include:
- Geometric pendants with intricate resin designs
- Bold, colorful earrings that showcase the resin's vibrant hues
- Delicate, layered necklaces featuring resin and other materials
Color Combinations and Patterns
One of the joys of working with epoxy resin is experimenting with different color combinations and patterns. By mixing various colors and adding pigments or glitters, you can achieve unique effects that make your jewelry stand out.
| Color Combination | Effect | Best For |
|---|---|---|
| Earth tones (browns, greens) | Natural, organic look | Pendants, nature-inspired designs |
| Bright primaries (reds, blues, yellows) | Vibrant, eye-catching | Statement earrings, bold accessories |
| Pastel shades (soft pinks, baby blues) | Soft, whimsical | Delicate necklaces, feminine jewelry |
Sources for Creative Inspiration
Finding inspiration for your epoxy resin jewelry designs can come from various sources. Some ideas include:
- Nature: Observe the colors and patterns found in flowers, leaves, and landscapes.
- Art and architecture: Look to famous artists, architectural styles, or cultural motifs for inspiration.
- Fashion trends: Follow current jewelry trends and think about how you can adapt them using epoxy resin.
By exploring different sources of inspiration and experimenting with various techniques, you can develop your own unique style in handmade resin jewelry.
Preparing Your Workspace for Epoxy Resin Projects
A well-prepared workspace is the foundation of creating beautiful epoxy resin jewelry. To ensure a smooth and enjoyable experience, it's crucial to set up your workspace correctly.
Choosing the Right Work Area
Selecting the right work area is the first step in preparing your workspace for epoxy resin jewelry making. Look for a space that is well-ventilated, has a stable surface, and is away from direct sunlight. This will help prevent the epoxy resin from curing too quickly or unevenly.
Consider dedicating a specific area for your projects, such as a workbench or a craft table. Ensure the surface is covered with a protective layer, like a silicone mat or parchment paper, to prevent damage from spills or drips.
Organizing Your Tools and Materials
Organization is key to efficiency and safety when working with resin jewelry molds and other materials. Keep your tools and supplies within easy reach to minimize movement and reduce the risk of accidents.
- Store your epoxy resin and hardener in a cool, dry place, away from direct sunlight.
- Keep your molds and shaping tools organized and easily accessible.
- Use containers or bins to store small items like glitter, color dyes, and other embellishments.
Ensuring Proper Ventilation
Proper ventilation is critical when working with epoxy resin, as the fumes can be hazardous to your health. Ensure your workspace has good airflow by opening windows or using a fan.
Consider investing in a respirator or mask designed for working with epoxy resin to further protect yourself. Additionally, keep your workspace clean and dust-free to prevent contamination of your projects.
By following these guidelines, you can create a safe and efficient workspace for your epoxy resin jewelry making projects. A well-prepared workspace not only enhances your creativity but also ensures the quality of your finished pieces.
Mixing and Pouring Epoxy Resin: Step-by-Step Guide
Creating unique and durable jewelry with epoxy resin requires a thorough grasp of the mixing and pouring techniques. Whether you're a beginner or an experienced crafter, understanding the intricacies of epoxy resin can elevate your DIY resin jewelry projects.
How to Measure and Mix Epoxy Resin Correctly
To achieve the desired results, it's crucial to measure and mix epoxy resin correctly. Always follow the manufacturer's instructions for the correct ratio of resin to hardener. Typically, this is in a 1:1 or 2:1 ratio, but it can vary.
- Use digital scales to ensure accuracy.
- Mix the components thoroughly in a well-ventilated area.
- Avoid mixing too much resin at once to prevent waste.
Pouring Techniques for Different Designs
The pouring technique can significantly affect the final appearance of your jewelry. For a smooth finish, pour the mixed resin slowly into your mold or onto your design surface. For more complex designs, you can use layering techniques or add colorants and materials before the resin cures.
| Design Type | Pouring Technique | Tips |
|---|---|---|
| Smooth Finish | Slow Pour | Use a heat gun to remove bubbles. |
| Layered Design | Layered Pour | Allow each layer to partially cure before adding the next. |
| Colorful Design | Mix-in Pour | Add colorants or materials before pouring. |
Avoiding Common Mistakes
Even experienced crafters can encounter issues when working with epoxy resin. Common mistakes include inadequate mixing, incorrect ratio of resin to hardener, and pouring too quickly. To avoid these, always double-check your measurements and mix thoroughly.
By following these guidelines and practicing your skills, you'll be well on your way to creating beautiful, professional-looking epoxy resin jewelry. Remember, patience and attention to detail are key to mastering DIY resin jewelry making.
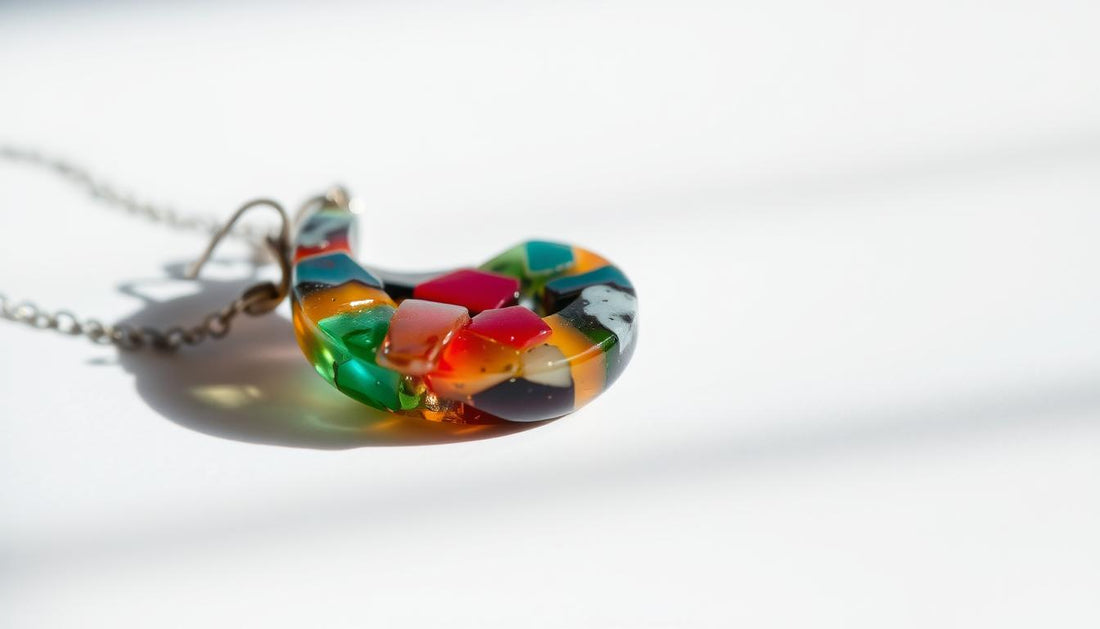
Adding Personal Touches: Embedding Objects
One of the most exciting aspects of creating resin jewelry is the ability to embed various objects, making each piece truly unique. Embedding objects in epoxy resin allows jewelry makers to add personal touches, creating one-of-a-kind handmade resin jewelry that stands out.
Using Dried Flowers and Leaves
Dried flowers and leaves are popular choices for embedding in epoxy resin. They add a natural, delicate touch to jewelry pieces. To embed dried flowers, ensure they are completely dry to prevent moisture from affecting the resin.
Tip: You can dry flowers by pressing them between the pages of a book for a few weeks or by using a desiccant.

Incorporating Glitter and Color Dyes
Glitter and color dyes are great for adding a pop of color and sparkle to your resin jewelry. When using glitter, mix it thoroughly into the resin to ensure an even distribution. Color dyes can be used to create a wide range of hues, from subtle pastels to vibrant brights.
Other Unique Items to Embed
The possibilities for embedding objects in epoxy resin are endless. Consider using other unique items like seashells, beads, or even fabric scraps to create interesting textures and designs. Experimenting with different objects can lead to innovative resin jewelry ideas.
| Embedded Object | Jewelry Type | Effect |
|---|---|---|
| Dried Flowers | Pendants, Earrings | Natural, Delicate |
| Glitter | Rings, Pendants | Sparkling, Colorful |
| Seashells | Earrings, Charms | Beachy, Unique |
By experimenting with different embedded objects, you can create a diverse collection of handmade resin jewelry that reflects your personal style and creativity.
Curing Your Projects: Tips for Success
To ensure your epoxy resin jewelry is both durable and visually appealing, understanding the curing process is essential. Curing is a critical step that can make or break the quality of your final product.
Understanding the Curing Process
The curing process involves a chemical reaction between the epoxy resin and hardener, resulting in a hardened, durable finish. This process can be influenced by factors such as temperature, humidity, and the ratio of resin to hardener.
Temperature plays a significant role in the curing process. Most epoxy resins cure best at temperatures between 70°F to 80°F (21°C to 27°C). It's crucial to follow the manufacturer's instructions for specific temperature requirements.
Ideal Conditions for Curing Epoxy
Creating the ideal conditions for curing epoxy resin is vital for achieving a flawless finish. This includes maintaining a consistent temperature, ensuring good ventilation, and avoiding exposure to dust or contaminants.
- Maintain a consistent temperature between 70°F to 80°F (21°C to 27°C).
- Ensure good ventilation to prevent the buildup of fumes.
- Avoid exposing your projects to dust or other contaminants.
Troubleshooting Common Curing Issues
Despite your best efforts, issues can arise during the curing process. Common problems include incomplete curing, bubbles, or a tacky surface. Understanding how to troubleshoot these issues can save your projects.
If your epoxy resin is not curing properly, check the ratio of resin to hardener and ensure that the temperature and humidity levels are within the recommended range.
For epoxy resin crafts and resin jewelry tutorial projects, being able to troubleshoot curing issues is an invaluable skill. It can help you achieve professional-looking results and enhance the durability of your creations.
Finishing Touches: Sanding and Polishing
To elevate your DIY resin jewelry to the next level, mastering the art of sanding and polishing is essential. A well-finished piece not only looks more professional but also feels more luxurious to wear.
The Importance of Proper Finishing
Proper finishing is crucial because it removes any imperfections, such as bubbles or dust particles, that may have occurred during the curing process. Moreover, a smooth finish enhances the overall appearance of the jewelry, making colors more vibrant and details more defined.
Sanding is the first step in achieving a smooth finish. It involves removing any surface imperfections and creating a uniform base for polishing.
Techniques for Sanding and Buffing
To sand effectively, start with a coarse grit sandpaper (around 120-150 grit) and progress to finer grits (up to 600 grit or more) for a silky smooth finish. For buffing, use a soft cloth or a buffing wheel with a polishing compound to achieve a high gloss.
- Begin with coarse grit sandpaper to remove major imperfections.
- Gradually move to finer grits for a smoother finish.
- Use a buffing wheel or soft cloth with polishing compound for a glossy finish.
Recommended Products for Polishing
For polishing epoxy resin jewelry, several products can be used, including specialized resin polishes and jewelry polishing compounds. Some popular choices include Novus Plastic Polish and Meguiar's Mirror Glaze.
| Product | Description | Best For |
|---|---|---|
| Novus Plastic Polish | A gentle, non-abrasive polish for plastics and resins. | Initial polishing and minor scratches. |
| Meguiar's Mirror Glaze | A high-quality polish for achieving a deep, mirror-like finish. | Final polishing for a high gloss. |

By following these steps and using the right products, you can achieve a professional finish for your epoxy resin jewelry, making it stand out in the world of DIY resin jewelry.
Selling Your Epoxy Resin Jewelry: Best Practices
Turning your epoxy resin jewelry making hobby into a successful business requires effective sales strategies. With the rise of handmade resin jewelry, online platforms have become essential for reaching potential customers.
Online Sales Platforms
Popular online marketplaces like Etsy and eBay are ideal for showcasing handmade resin jewelry. Utilize high-quality product images and detailed descriptions to attract buyers.
Effective Marketing
To market your epoxy resin jewelry effectively, leverage social media platforms like Instagram and Facebook. Share resin jewelry ideas, behind-the-scenes content, and customer testimonials to engage with your audience.
Pricing Strategies
When pricing your handmade jewelry, consider the cost of materials, time, and other expenses. Research competitors in the epoxy resin jewelry making niche to determine competitive pricing for your unique pieces.
FAQ
What is the best way to get started with epoxy resin jewelry making?
To get started, you'll need to familiarize yourself with the basics of epoxy resin, including the necessary materials and tools. Begin by practicing simple projects, and then move on to more complex designs as you gain confidence and experience.
What safety precautions should I take when working with epoxy resin?
When working with epoxy resin, it's essential to wear protective gear, including gloves, safety glasses, and a mask. Ensure good ventilation in your workspace, and avoid skin contact with the resin.
How do I choose the right epoxy resin for my jewelry making project?
When selecting an epoxy resin, consider the specific requirements of your project, such as the desired color, clarity, and durability. Research different types of epoxy resins, and read reviews to find the best one for your needs.
What are some common mistakes to avoid when mixing and pouring epoxy resin?
Common mistakes to avoid include incorrect mixing ratios, inadequate mixing, and pouring too quickly. Always follow the manufacturer's instructions, and take your time when mixing and pouring the resin.
How can I achieve a professional finish on my epoxy resin jewelry?
To achieve a professional finish, sand and polish your jewelry thoroughly. Use a high-quality polishing compound, and follow the manufacturer's instructions for application and buffing.
Can I embed any object in epoxy resin, or are there certain limitations?
While you can embed a wide range of objects in epoxy resin, some materials may not be suitable due to their texture, size, or composition. Experiment with different objects, and test their compatibility with the resin before creating a final piece.
How do I price my handmade epoxy resin jewelry for sale?
When pricing your handmade jewelry, consider the cost of materials, time, and other expenses. Research your market, and compare your prices to those of similar products. You may also want to consider the value of your time, expertise, and the uniqueness of your creations.
What are some effective ways to market my epoxy resin jewelry online?
To market your epoxy resin jewelry online, utilize social media platforms, such as Instagram and Facebook, to showcase your creations. Take high-quality photos, and write engaging descriptions to attract potential customers. You can also consider online marketplaces, like Etsy, and collaborate with influencers or other jewelry makers.
What are some popular resin jewelry molds that I can use for my projects?
Popular resin jewelry molds include silicone molds in various shapes and sizes, as well as metal and plastic molds. You can also create your own custom molds using materials like silicone or resin.
How can I ensure proper ventilation when working with epoxy resin?
To ensure proper ventilation, work in a well-ventilated area, such as a room with open windows or a fume hood. You can also use a fan or ventilation system to remove fumes and particles from the air.